Blog series: Migrate a Optimizely/Episerver plugin from CMS 11 to CMS 12 – Migration

This blog post is the first one in the blog series: Migrate a Optimizely/Episerver plugin from CMS 11 to 12. The plugin we are going to migrate is called SIRO (Sitemap and Robots generator) developed by Verndale. You can find more information about the CMS 12 version in this blog post with the same features as the CMS 11 version. We also have to understand that the Optimizely CMS version 12 works in .NET Core framework instead of the .NET framework which was used in CMS 11. The, now called .NET framework is multi-platform and performance focused while the old one worked only in Windows and due to its longevity was getting quite cluttered and slower over time. CMS 12 works with version 5.0 which is not the latest one but there are not many breaking changes between 6.0 (latest) and 5.0. So without further due lets begin.
First, we must update the current project structure of the plugin to the new one used in .NET core projects. For this, we are going to use the tool develop by Microsoft with help from Optimizely called Upgrade Assistant. You can find the GitHub repository of the tool here. We will first install it using a command line terminal and executing this command:
dotnet tool install -g upgrade-assistant
That will install globally the upgrade assistant tool but if you have already installed it, you will see a screen similar to the one below

After, installation go the root folder of your project and execute the following command:
upgrade-assistant upgrade/analyze <Path to csproj or sln to migrate>
If you use the upgrade-assistant analyze command, the tool will try to generate a general overview about how successful the migration is going to be. In our case, we are going to put the solution name of the plugin project and analyze it.

This will generate a sarif report file and a cleft file in the root of your project.

To view the sarif file you can install this tool from the VS marketplace. After analyzing the project you can then proceed to upgrade it using the upgrade command. This will show you a list of options to choose so you can go step by step migration your project.


Step 2 is going to migrate the project from project file to SDK style.


Step 3, clean up any NuGet package reference so next time it compiles it gets the new ones for the new framework. It is highly possible that some of the package references have not been migrated to the new framework so you will have to use alternatives or remove the functionality that depends on it altogether.


The result of the step will return to which version of the .NET core framework was update. In this scenario, to 5.0 version.

Step 5 will try to update the NuGet packages that are compatible with the new .NET core version, in this case 5.


The step will display the different classes which it found the issues and try to apply the fix.

Next, step 9 part b is going to be executed. This will try to upgrade some types which are not longer available or have been renamed in .NET 5.0

The step will display which classes have been modified and if there are some classes which the tool was not able to update.

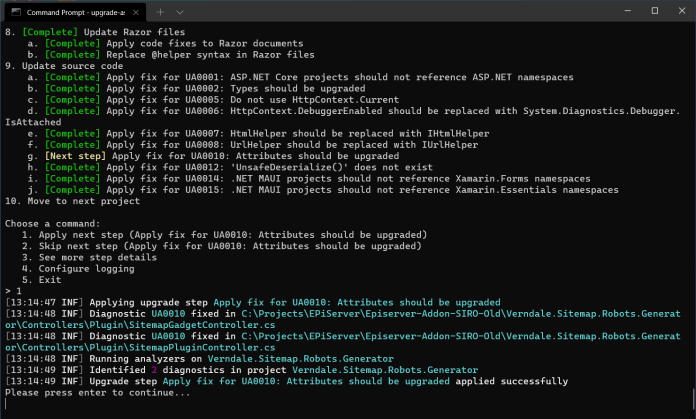
Then, step 9 part g is going to try to upgrade attributes which again are not anymore in the framework or have been renamed.

The step will display the classes affected and which ones were not updated properly.
Finally, step 9 will try to update everything else which considers obsolete.

And again the step result will display which classes have been modified and more important, which ones will require manual changes in order to compile properly. For instance, in this scenario, two classes will require to be updated manually because http handlers and modules do no exists anymore in .NET core.

At this point your project will be migrated to the new framework and you can just press 5 to exit the tool.

It is important to understand that the steps applied to our use case is not going to match other projects, specially in steps 8 and 9, because it will depend of the type of project migrated, if is web, console, windows, mobile and so on and how old the project is.
And that is it. You can now open your upgraded project and see what is broken and try to fix it. We are going to cover that in our next blog of these series. If you have any questions or suggestions please let me know in the comments. I hope it can help someone and as always keep learning !!!
1 COMMENT